
In this User Guide, we’ll cover how to leverage the OAE Math functionality to add display formulas within estimates and the project header to enable more advanced reporting and estimate analysis.
Table of Contents
Overview
The OAE Math functionality allows organizations to specify custom formulas that can be viewed in various levels in the estimate. This is useful for reporting and bid analysis, allowing organizations to configure their own formulas and display the results of the formulas in various locations. Common examples include Margin Dollars or Cost per Square Feet.
Default Math Settings for Admins
Application administrators can specify default Math settings that are inherited by all newly created projects. When a new project is created, the configuration in the Default Math tab will be copied into the new project.
To configure default Math settings, go to System Settings > Default Math. From there you can add equations and modify existing ones. See the Configuring OAE Math section below for details on how to do that.

Project Math Settings for Users
Once a project is created, users can modify the OAE Math settings directly, without impacting other projects or the system default settings.
To configure project specific Math settings, go to Project Settings > Math. From there you can add equations and modify existing ones. See the next section for details on how to do that.
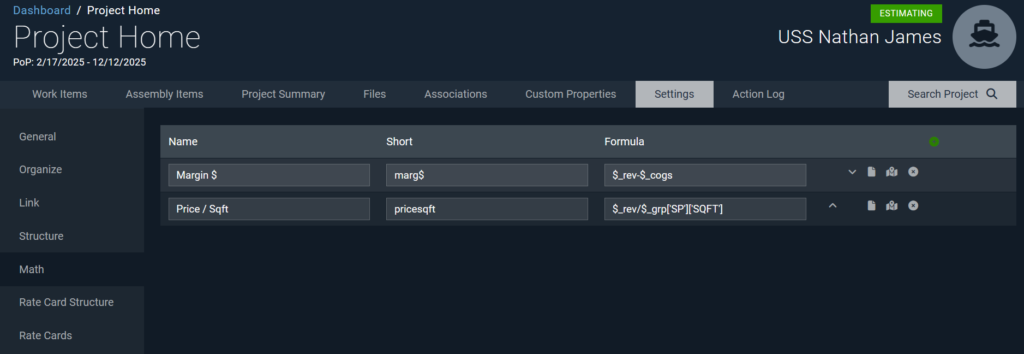
Configuring OAE Math
OAE Math allows users to control the formulas used, the display of the results, and the location where the formula results display. To add a equation, use the green + button:

Formulas
When configuring new Math equations, the first step is to specify the formula:
- Name: Name of the formula. The Name will appear in various location with the formula result, including the Work Item Header and Line Item Header.
- Short: Short name for the formula. The Short name will appear in various locations with the formula result, including the Work Item List and Line Item List.
- Formula: Defines the math equation to be used to run the calculation. See the next section for more details on referencing rate card and custom property information in formulas.
Formula Syntax
The Formula field supports similar math as in other areas of OAE, such as Calculators and Rate Cards. Users have access to the following standard variables:
| Description | Variable | Notes |
|---|---|---|
| Units Aggregate | $_units | From the Aggregate column in the rate card’s Structure. |
| COGS Aggregate | $_cogs | From the Aggregate column in the rate card’s Structure. |
| Info Aggregate | $_info | From the Aggregate column in the rate card’s Structure. |
| Revenue Aggregate | $_rev | From the Aggregate column in the rate card’s Structure. |
| Overhead Aggregate | $_overhead | From the Aggregate column in the rate card’s Structure. |
| Input value from the user | $v | This is the value manually entered into the estimate. |
| Percentage applied to the Type or Subtype | $p | This is 100% unless Subtypes are configured in the structure. |
| Rate card structure column | $key | Use the value in the Key column in the rate card Structure. E.g. if the Key is mgmt, the variable is $mgmt. |
| A different column in the estimate’s Structure | $_row['shortName'] | Use the value in the Short column in the estimate’s Structure. E.g. if the Short name is crew, the variable is $_row['crew']. |
| A project custom property in a group | $_proj['groupShortName']['propertyShortname'] or $_proj.groupShortName.propertyShortName | Use the value in the Short column in the project’s Custom Properties. E.g. if the group’s Short name is SP, and the property’s Short name is SqFt, the variable is $_proj['SP']['SqFt'] or $_proj.SP.SqFt. |
| A singleton project custom property | $_proj['propertyShortName'] or $_proj.propertyShortName | Use the values in the Short column in the project’s Custom Properties. E.g. if the property’s Short name is SqFt, the variable is $_proj['SqFt'] or $_proj.SqFt. |
| A work item custom property in a group | $_grp['groupShortName']['propertyShortname'] or $_grp.groupShortName.propertyShortName | Use the values in the Short column in the work item’s Custom Properties. E.g. if the group’s Short name is SP, and the property’s Short name is SqFt, the variable is $_grp['SP']['SqFt'] or $_grp.SP.SqFt. Note that the system will take the Total value of the work item custom property. |
| A singleton work item custom property | $_grp['propertyShortName'] or $_grp.propertyShortName | Use the value in the Short column in the work item’s Custom Properties. E.g. if the property’s Short name is SqFt, the variable is $_grp['SqFt'] or $_grp.SqFt. Note that the system will take the Total value of the work item custom property. |
Group Custom Properties
To access values within group custom properties, use the Short name of the property storing the value, with the syntax $_proj[‘GroupShortName’][‘PropertyShortName’] or $_grp[‘GroupShortName’][‘PropertyShortName’].
For example, assume there is a custom Work Item property defined to capture the spaces associated with a Work Item, as shown below.
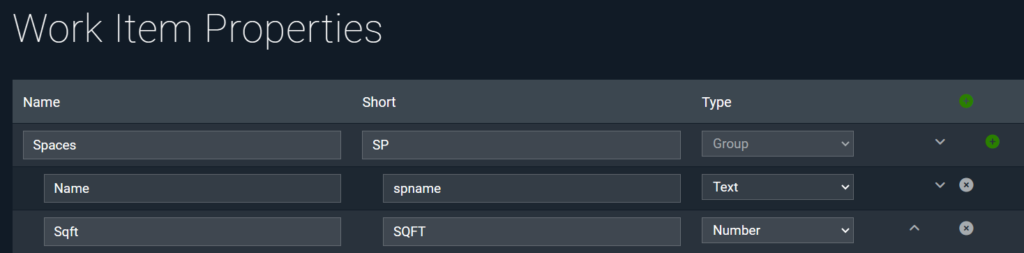
To use the value of the Sqft property in that group in a formula, you’d enter $_grp['SP']['SQFT'].
In addition to brackets, the system also supports dot-notation. For example, you could also reference that Sqft property using $_grp.SP.SQFT.
Rate Card Values
Accessing values from individual rate cards (as opposed to the aggregate values in the syntax table above) works as follows, using the $_rateCard function.
You need one or more variables:
rateCardName: A rate card’s Name – the value you choose from the Select Rate Card dropdown in the Rate Cards pagerateCardColumnName: The Name of a rate card structure columnaggregateName: An Aggregate’s name from the rate card structurestructureShortName: The Short name of a structure column
Note that there are two ways to use these variables in the syntax, e.g. $_rateCard['Rate Card Name'] or $_rateCard.rateCardName. If the value for any variable you want to use has a space in it, then you have to use the bracket notation for the entire syntax. The dot notation assumes no spaces.
For example, for rate card A and column Cost, you can write $_rateCard.A.total.total.rateCardColumn.Cost – but if the column is QA Time, then you have to write $_rateCard['A']['total']['total']['rateCardColumn']['QA Time'].
Here’s what this function gives you access to. To keep it easier to read, we’ll just show the dot notation.
Rate card totals from rate card column
Syntax: $_rateCard.rateCardName.total.total.rateCardColumn.rateCardColumnName
Example: For the total of the Cost column in rate card A, use: $_rateCard.A.total.total.rateCardColumn.Cost
Rate card totals from rate card aggregate
Syntax: $_rateCard.rateCardName.total.total.aggregatePointTotal.aggregateName
Example: For the total from the COGS aggregate in rate card B, use: $_rateCard.B.total.total.aggregatePointTotal.cogs
Structure totals from rate card column
Syntax: $_rateCard.rateCardName.structure.structureShortName.total.rateCardColumn.rateCardColumnName
Example: For the value of the Cost column in Rate Card C, for a Structure column with the Short name Matl, use:$_rateCard.C.structure.Matl.total.rateCardColumn.Cost
Structure totals from rate card aggregate
Syntax: $_rateCard.rateCardName.structure.structureShortName.total.aggregatePointTotal.aggregateName
Example: For the total from the COGS aggregate in Rate Card A, for a Structure column with the Short name Matl, use: $_rateCard.A.structure.Matl.total.aggregatePointTotal.cogs
Structure column value for specific rate card
Syntax: $_rateCard.rateCardName.structure.structureShortName.value
Example: For the specific value entered in a Structure column with short name SP, associated with Rate Card A, use: $_rateCard.A.structure.SP.value
If you have any questions about how to build a formula you need, please reach out to us.
Properties
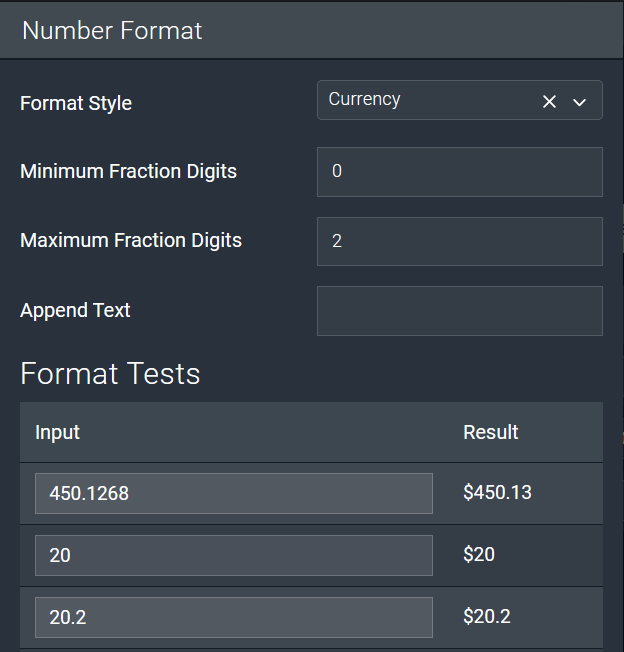
Depending on the field type, you have some control over how a formula result is displayed. To edit a formula’s Properties, click on the paper icon next to the Formula field.

The Number Format window will then open:
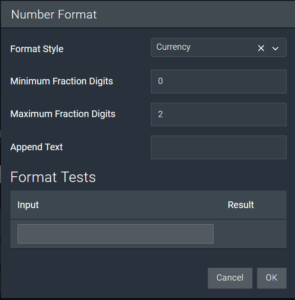
Here’s what the fields mean:
- Format Style: Determines how the formula result should be displayed.
- Decimal: As a
Numberwith decimal places determined by the subsequent property settings. - Currency: With a
$in front with decimal places determined by the subsequent property settings. - Percent: Convert the result to a Percent and display with a
%sign at the end.
- Decimal: As a
- Minimum Fraction Digits: Ensures that the formula result is displayed with at least this many decimal places. For example, if 2 is entered, results will always display with 2 decimal places, even if the decimal is
.00. - Maximum Fraction Digits: Ensures that the formula result is displayed with no more than this many decimal places.. Results will be rounded to the specified decimal place.
- Append Text: Provides the option to append any text to the end of the results. In the price per sqft example, the Append Text field could be set to
$/sqftto have the result always display with that text: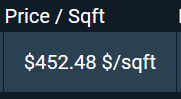
- Format Tests: Use this section to test example formula results and see how the result will appear in the system, based on the properties specified. The Inputs entered do not affect the estimate at all. They are solely for testing purposes.
Locations
In OAE Math, the Locations settings determine where the formula results will display in the project, Work Item, and/or Line Item. To edit the Locations, click on the map icon in a formula:

The Result Locations window will open:
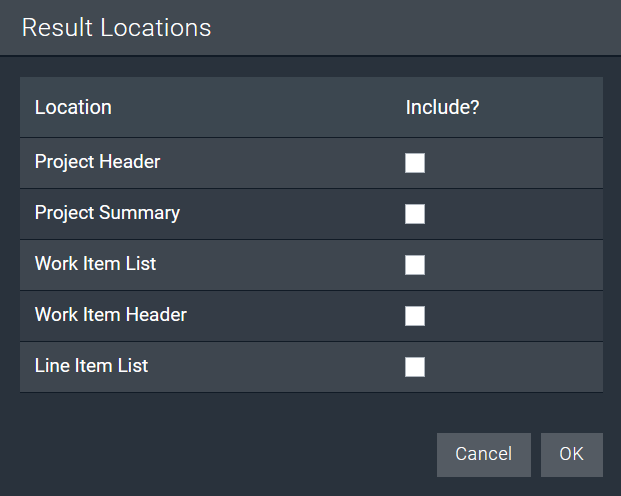
Select each Location you want the formula result displayed, and click OK.
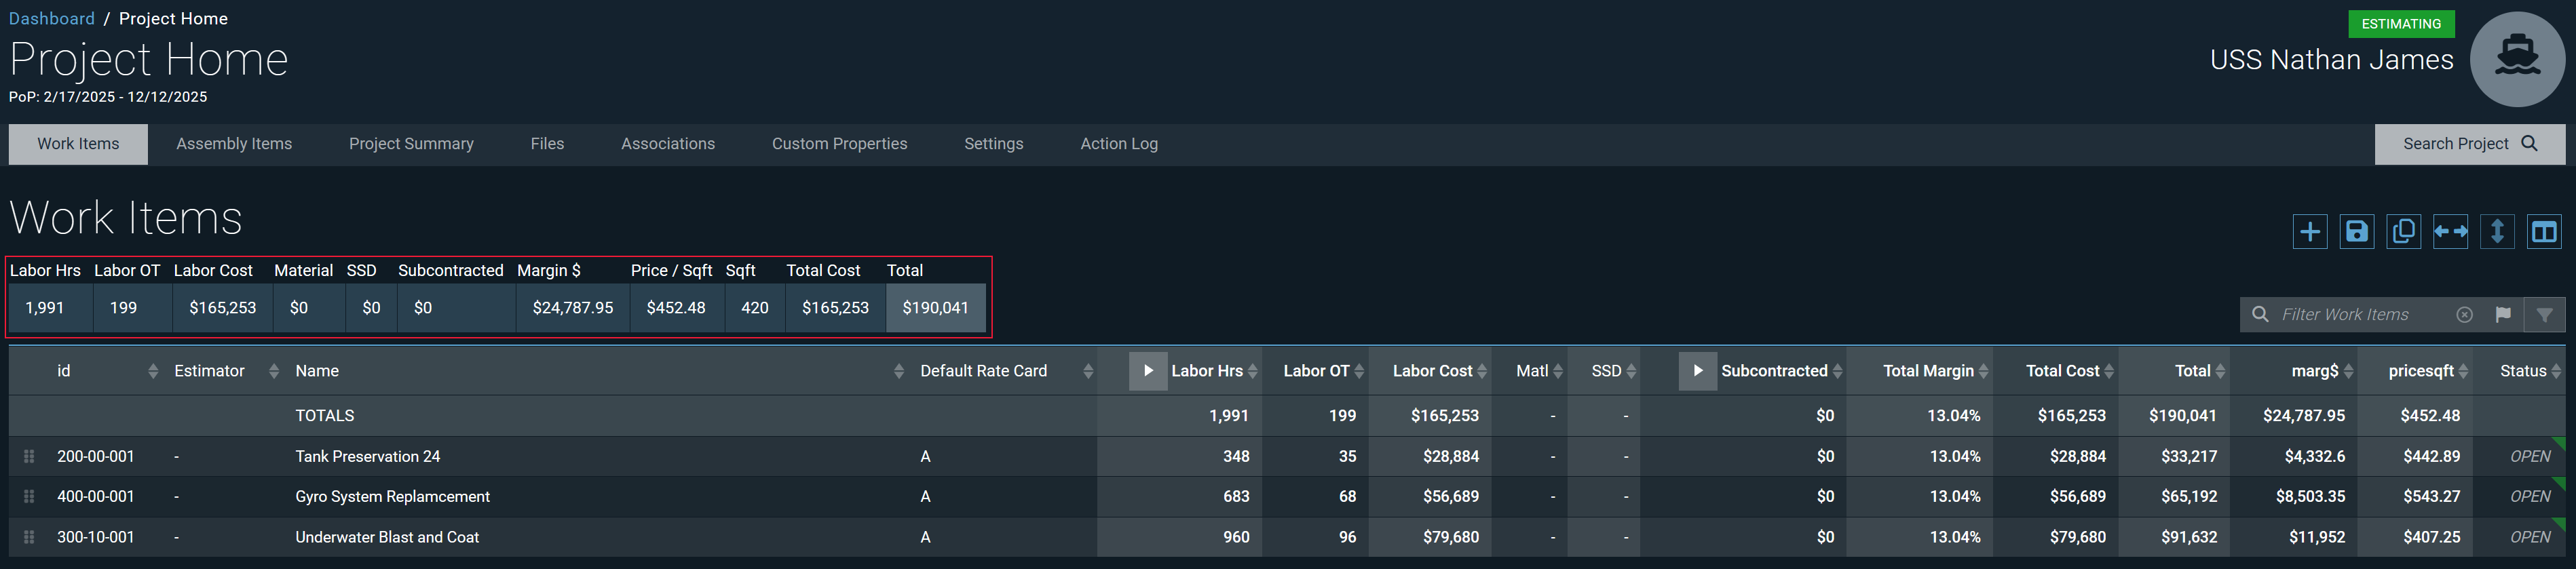
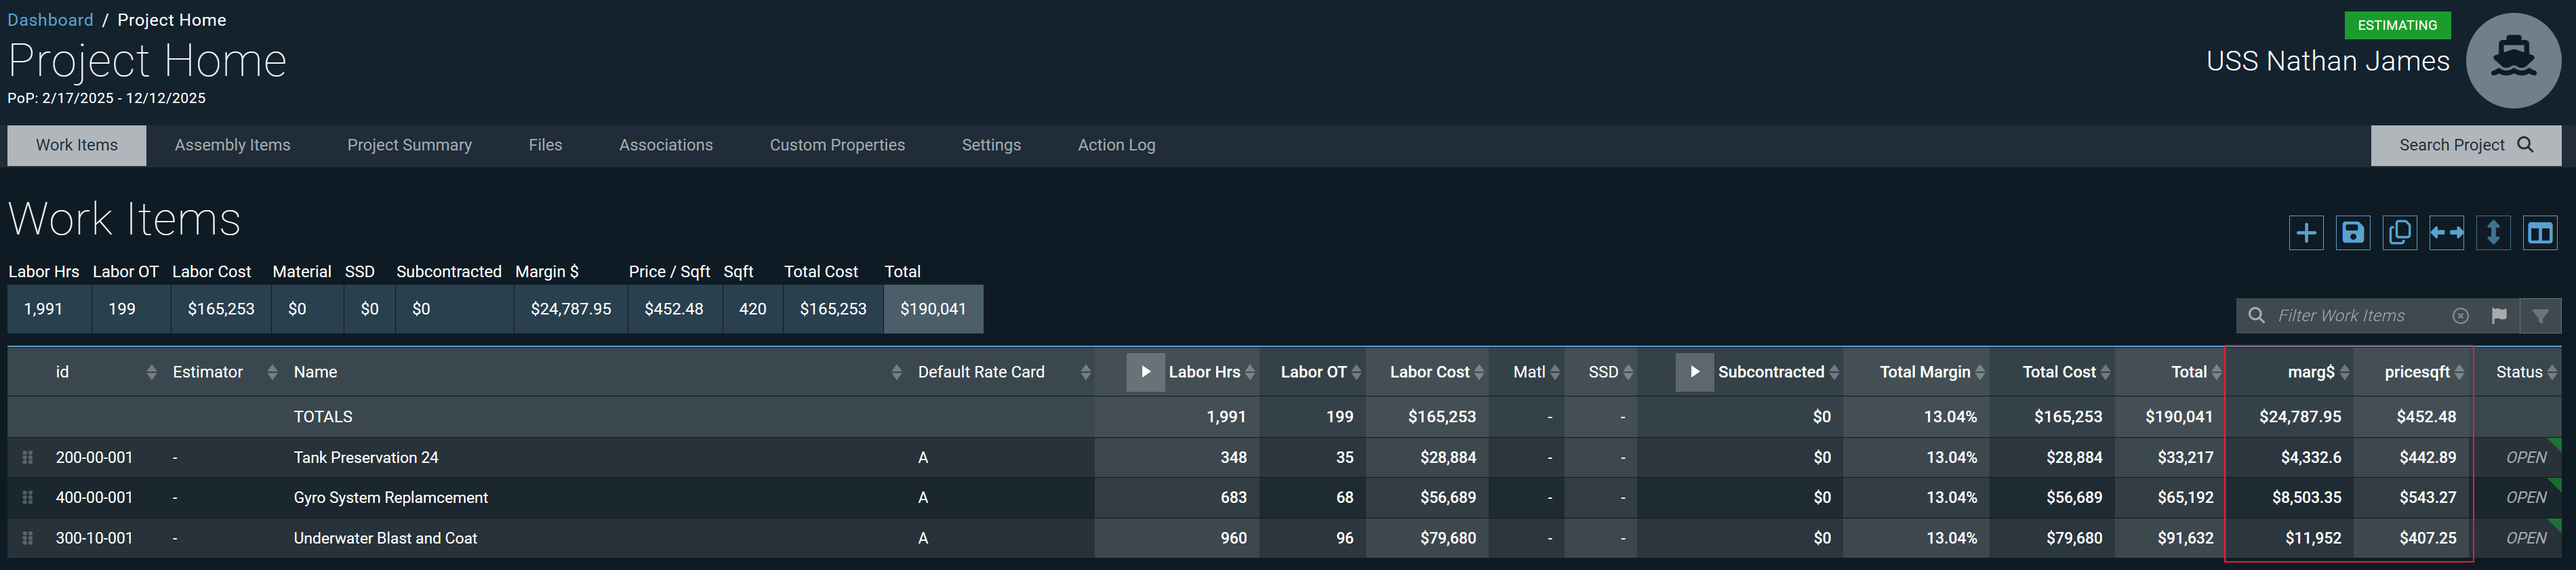
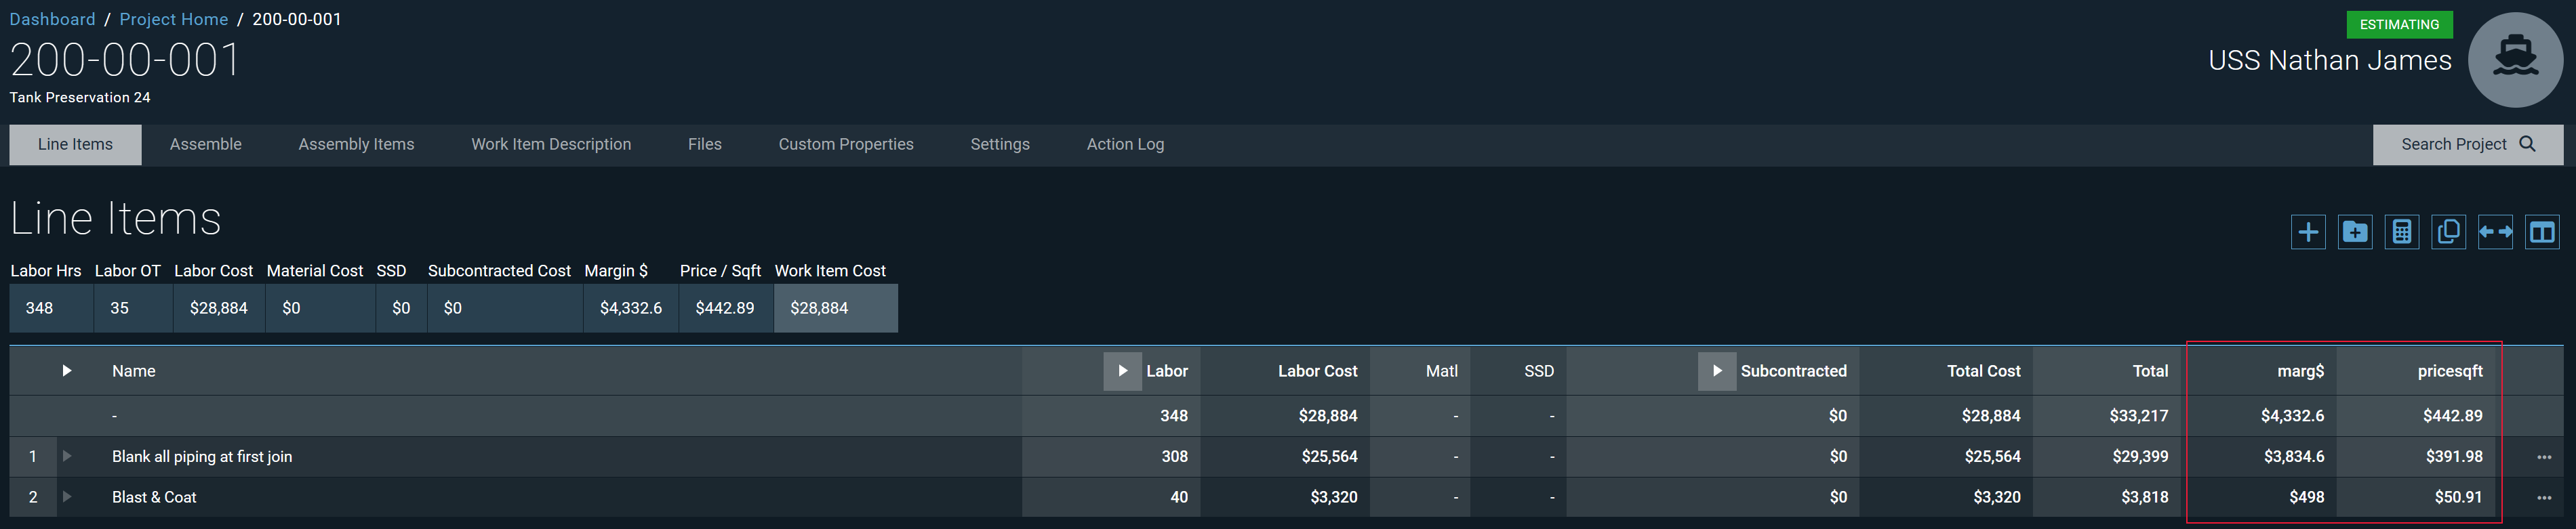
- Project Header: The result will appear in the summary row on the Work Items tab in Project Home. The column title will be the Name used for the formula.
- Project Summary: The result will appear on the Project Summary tab of the estimate.
- Work Item List: The result will appear as a column in the Work Item table in the Work Items tab in Project Home. The column title will be the Short Name used for the formula.
- Work Item Header: The result will appear in the summary row on the Line Items tab within an individual Work Item. The column title will be the Name used for the formula.
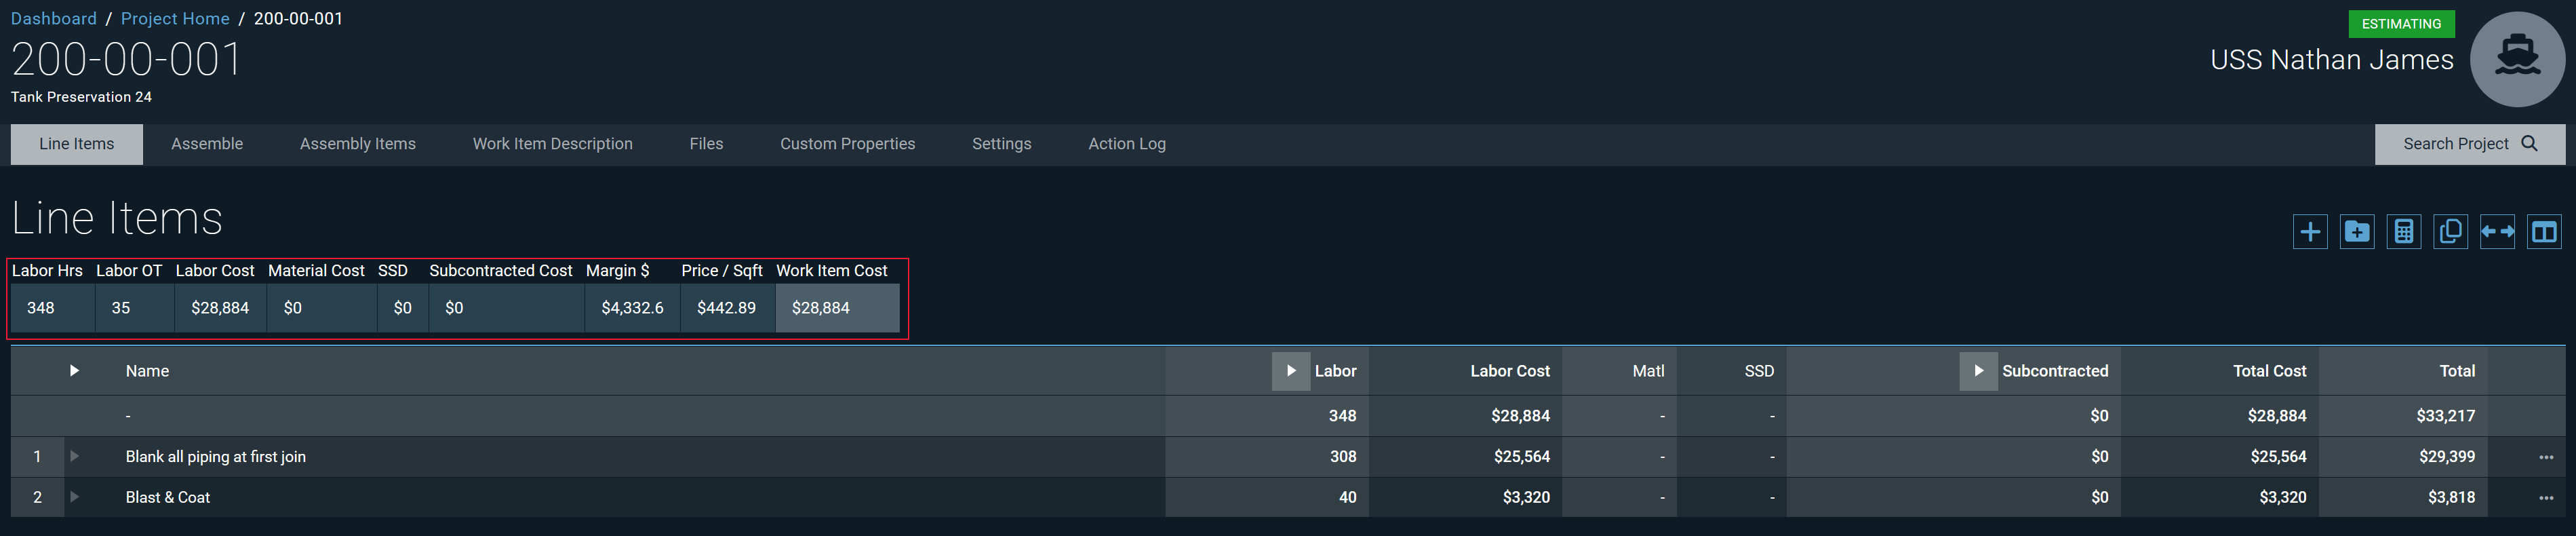
- Line Item List: The result will appear as a column in the Line Item table in the Line Items tab in an individual Work Item. The column title will be the Short Name used for the formula.
Learn More
Check out the rest of our User Guides to learn more about OAE.
