
In this Admin Guide, we cover OAE Structures – understanding them, using defaults and calculated columns, and organizing your Structures.
Table of Contents
OAE Default Structures
OAE Default Structures can be reviewed and edited by admins in the Default Structure tab in System Settings. Default Structures define the structure that each newly-created project will inherit. Multiple structures can be defined at the system level, and can be selected during the new project creation process. Once a project is created, its individual structure can be edited to differ from the Default by any admin.
Note: If the Default Structure is updated, the structure of already created projects will NOT automatically update. You will need to update manually if necessary.

By default, the structure contains three Groups of rows: Labor, Material, Subcontracted.
Structure Overview
Within the table of your selected structure, there are five main columns available to configure:
- Name: The full name of the column
- Short: The text that will appear in the column headers on work items and line items
- Input As: What type of values you will be inputting in the column, and how you would like those values to be used (or not) for calculations. Available options explained below:
- Bill: Enter the
$amount that you want included in the Bill amount. This amount will be included in Cost and Bill total, but with NO markup applied (pass-through). - Bill Only: Enter the
$amount that you want included in the Bill amount. This amount will ONLY be included in Bill amount; it will NOT be included in the the Cost amount (pure profit). - Cost: Enter the
$amount that something costs. This amount will be included in Cost amount and a markup will be applied when added to the Bill amount. - Date: Enter a date. Typically used to specify Start and End dates for line items.
- Report Only: Inputted values will be summed and can be summarized, but will NOT be included in Cost or Bill totals, or Margin.
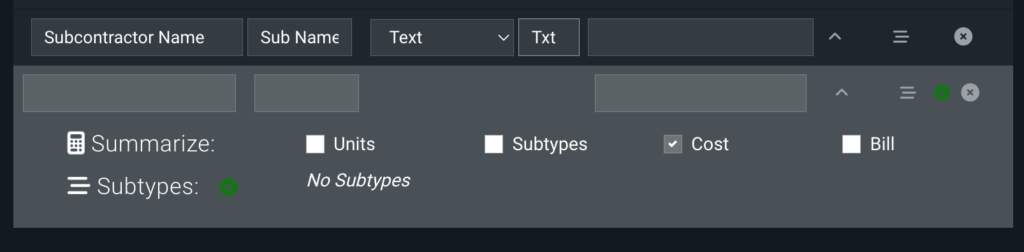
- Text: A free-text column for something such as Subcontractor Name.
- Units: Accepts number values. Typically used for hours, but can be gallons, feet, etc. – the actual unit goes in the Units field as described below.
- Calculated: Rather than having a column that requires the user to input a value, the structure also supports the ability to display a Calculated column. Calculated columns are used to display values or columns calculated in the rate card – see the section below for more about Calculated columns.
- Bill: Enter the
- Units: Choose Hrs, $, or Txt as the unit of measure to apply to the value
- If Input As is
Bill,Bill Only, orCost, then choose$for Unit. - If Input As is
Units, then enter the plural unit, like hrs. - If Input As is
Text, then choose$Txtfor Unit. - If Input As is
Report Only, either $ or Hrs are applicable.
- If Input As is
- Description: Enter notes that are applicable to the column.
Calculated Columns
All columns in OAE Structures require an input from a user, except for Calculated columns. In OAE Structures, Calculated columns let you include values that are automatically calculated. Remember that before you can use a column for a Calculated column, it has to be configured in the rate card, or it just won’t show up as a choice.
A Calculated column has a Calculator button instead of the Units field – click it to configure the Calculated column.

Note that the configuration options here are the same as the Distribution options available when distributing work item values.
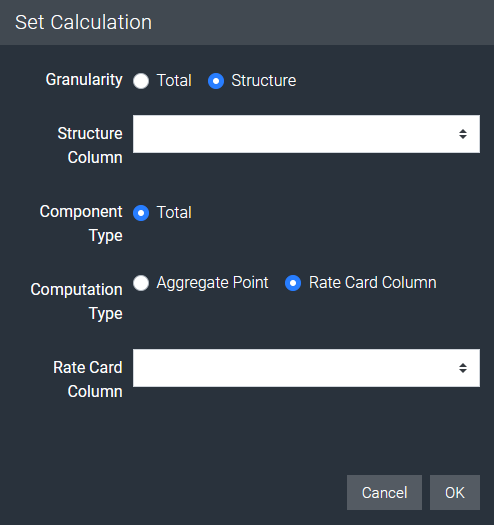
- Granularity: Select Total if you need to display the total value from a rate card column or rate card aggregate point. Select Structure if you need to display the value based on the calculation from a specific structure column.
- Structure Column: This option is only visible when Granularity is set to
Structure. Select the specific structure column or one of the group names to display the rate card calculation from. - Component Type: This option is only visible when Granularity is set to
Structure.- Total: Select Total if the value you need to display should come from the sum of all the subtypes. When Total is selected, you will then select the Computation Type and Aggregate Type to define how the work item is distributed using rate card columns and aggregate points.
- Subtype: Select Subtype if you need to display the value from a specific Subtype value, such as Overtime Hours.
- Entered Value: This option only appears if a single column is selected in the Structure Column field. Select Entered Value if you need to display the calculation based on the Entered Value only.
- Computation Type: Select Aggregate Point if the value to display should be the sum of the calculations of a specific rate card aggregate group defined in the rate card structure. Select Rate Card Column if you need to display the value based on a specific column in the rate card structure.
- Aggregate Point: This option is only visible when Computation Type is set to
Aggregate Point. Select one of the predefined aggregate groups defined in the rate card structure, such asUnitsor COGS. - Rate Card Column: This option is only visible when Computation Type is set to Rate Card Column. Select one of the rate card columns that have been defined in the rate card structure.
Next to the Calculator button is the Configure Format button, which works the same way as the formatting options for Math formula properties. It lets you control the display formatting for decimal, currency, and percent values, like setting the number of decimal places to show, and adding a unit of measurement (or other text).
Summarize
You can choose whether, for the Project Home, Project Summary and Work Items screens, the values should be summarized by Units, Subtypes, Cost, and Bill.

Note: Units will only be available if there are children in the group that are Input As Units, and Subtypes will only be available if there are Subtypes for that group.
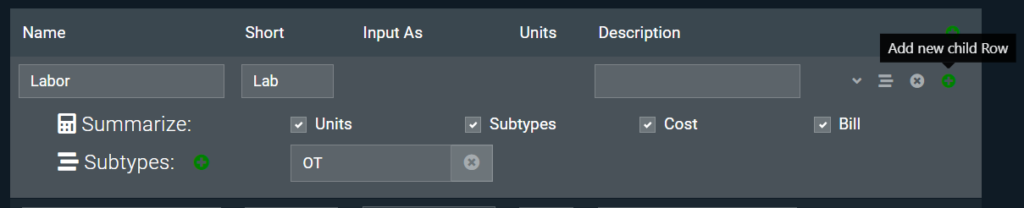
Subtypes
In OAE Structures, Subtypes allow you to add a subcategory for an entire group, such as adding Overtime to the Labor Group. This allows you to calculate the % of Units and the Markup applied to the Subtype.
Add Subtype
To add a new Subtype to a group, clicking the green + button next to the Subtypes section. The new Subtype choice will appear to the right of the existing one.

Add New Child Row
You can add a new child row to a group by clicking the green + button to the far right of the group section. Note that the new row will appear at the bottom of the group, so you may have to scroll down to find it.
Add Group
You can add a new group by clicking the green + button at the top right of the structure table.

Note that the new row will appear at the bottom, so you may have to scroll down to find it.
Learn More
Check out the rest of our Admin Guides to learn more about configuring OAE.
