
In this User Guide, we’ll cover how OAE import adds and reconciles Work and Line Items, with or without estimates, into a new project or an existing project.
OAE Import Template
Using OAE import is a three step process no matter what you’re trying to do or whether it’s for a new or existing project.
- First, download the template.
- Second, populate the template according to your objective.
- Three, import the file using the import option that fits your objective.
You can download the template at each of the places you can do an import (we’ll cover those later). The Download import template button is always right under the file upload field in an import window.

Hit the Download button and the import template .xlsx file will download. Note that this template is dynamically generated based on the project’s settings, so always download a fresh one to avoid problems.
Populating the Import Template
There are a number of ways to use the import template. You can:
- Add just Work Items, without estimates.
- Populate custom property groups for work items.
- Add work and line items, without estimates.
- Add a line item to multiple work items.
- Add work and line items, with estimates.
There are two template sheets in the file, and for any given import you’ll only need one, so be sure to delete the unused sheet and the instruction sheet before you upload.
If you plan to import using .xlsx, note that the import assumes the data to be imported is on the first sheet and starts in column A and row 1. Inserting empty (or extraneous) rows or columns before your import data will mess up the import results.
Importing only Work Items
When adding work items, use the Work Item Template sheet. Populate the following columns.
- *Item# – The item id – e.g. “100-00-001”
- Rate – The rate card, e.g. “A” or “B”; no value becomes the property’s default rate card.
- *Item Name – The work item Title or line item Name
- Estimator – The email address of the assigned estimator
- Remarks – Notes about the item
* Item# and Item Name are required fields when importing work items.
Populating Custom Property Groups for Work Items
These instructions apply whether you’re using the Full Estimate or Work Item template sheet in the template.
To import custom property groups for work items, add a column to the import sheet for each property, using this special syntax for the column header: CP:[group's Short name].[index number].[property's Short name]
Here’s what that means:
CP:– Tells OAE the column is a custom property value to be imported.- the group’s Short name – the Short name for the work item custom property group
- an index number – the row number within the group that the value will be added to
- the property’s Short name – the Short name for the custom property that will be updated
Here’s an example. If a property group has the Short name SP, and contains two properties whose Short names are spname and SQFT, then the row in the import file to populate those properties might look like this:

So for the fourth column CP:SP.1.spname, the work item custom property group’s Short name is SP, the index number is 1, and the custom property’s Short name is spname.
The imported result would be this:

Importing Work Items and Line Items
If you would like to import line items and work items (called a ‘full estimate’), use the Full Estimate Template sheet. It has an additional required column.
- *Line – This is used to differentiate between “work items” and “line items”, and does not need to contain unique values.
- 1 indicates a work item.
- An empty cell will become a work item.
- 2+ indicates a line item.
- 1 indicates a work item.
- *Item# – The item “code” – e.g. “100-00-001”
- Rate – The rate card, e.g. “A” or “B”; no value becomes the property’s default rate card.
- *Item Name – The work item Title or line item text
- Parent Line Id – Lets you create line item groups (see below).
- Estimator – The email address of the assigned estimator
- Remarks – Notes about the work or line item
* Line, Item#, and Item Name are required fields when importing work items.
To import just the items without estimates, delete the Structure columns between Estimator and Remarks. If you want to include estimates, see the next section.
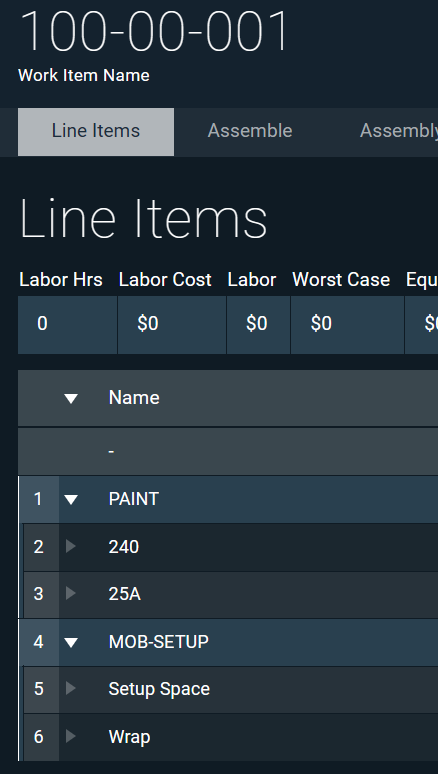
To create line item groups in the import, add and populate a column called Parent Line Id. Putting a Line # here makes that Line # the parent of a group containing all line items with the same Parent Line Id. Say, for instance, we import the following lines:
| Line | Item # | Item Name | Parent Line Id |
|---|---|---|---|
| 1 | 100-00-001 | Work Item Name | |
| 2 | 100-00-001 | Paint | |
| 3 | 100-00-001 | 240 | 2 |
| 4 | 100-00-001 | 25A | 2 |
| 5 | 100-00-001 | Mob-Setup | |
| 6 | 100-00-001 | Setup Space | 5 |
| 7 | 100-00-001 | Wrap | 5 |
In the above example, we’re importing one work item with six line items. Line 2, the Paint item, has two items with 2 in the parent field: Lines 3 and 4. Same with Line 5 and Lines 6 and 7. And here we see the imported line item groups:
Importing Work Items and Line Items with Estimates
This OAE import option builds on the previous section, once again using the Full Estimate Template sheet.
Any columns in the worksheet aside from the standard columns listed previously are assumed to be estimate parameters.
- For Work Items (where the “Line” column = 1)…
- … all other columns are ignored, since they reflect totals that OAE calculates internally.
- For Line Items (where the “Line” column >1)…
- … additional columns are compared to the “Short” values in the structure – e.g. “PD” gets assigned to “Production Hours” labor. All other columns get ignored.
You can see an example of this on the Full Estimate Template sheet.
Running OAE import
Once you’ve filled in your import file as shown in the template, you can leave it as an .xlsx file, or save it as a .csv file. OAE import supports both. If you do import as .xlsx, note that the first tab of the spreadsheet is the one that will import, so make sure to delete or move any other sheets.
There are several places you can import a file, depending on what you want to do.
- Add items to a new project, for the first time.
- Add more items to an existing project, that already has items.
- Update a project with a complete set of work items, including deletions if needed.
- Update some of a project’s existing line items.
- Add new line items to existing work items.
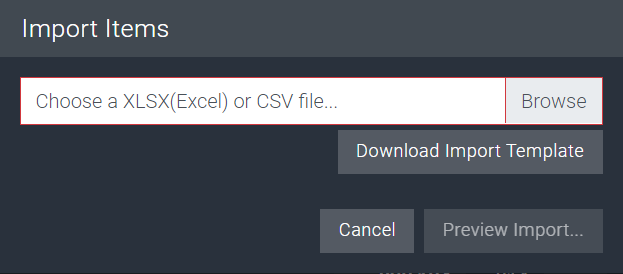
Importing Items into a New Project
To populate a new project for the first time, use the Add Project button on the Projects page, then switch to the Import tab.
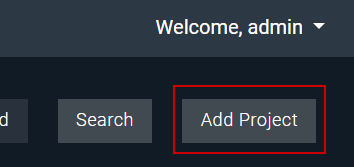
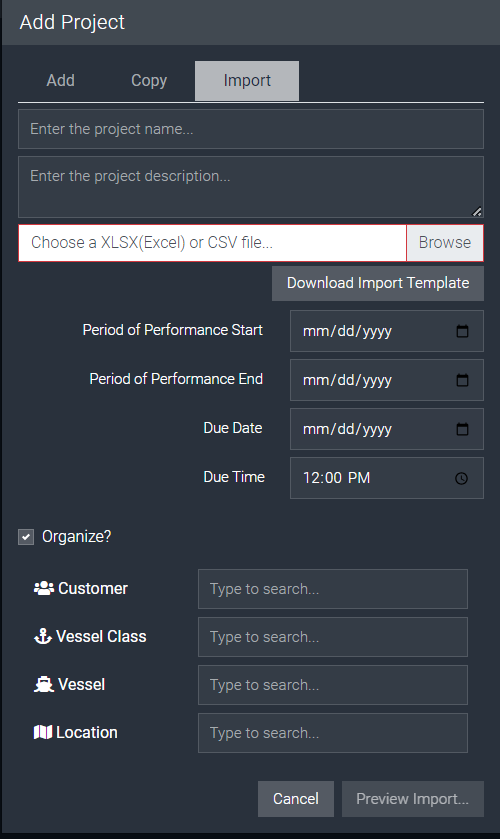
Enter the name and description of the new project, then use the Browse button to select the file you’d like to import.
You don’t have to wait until the import file is processed to find out you formatted something incorrectly. Use the Preview Import… button at the bottom of the Add Project screen to confirm that the system recognizes the expected number of Work Items, Line Items, and estimators. It will summarize what it sees. If something doesn’t look right, just Cancel.

After hitting GO! to import, continue through the standard project creation process to create the project with the estimate details included in your import file.
Adding More Items to an Existing Project
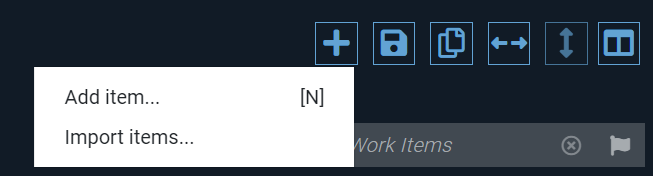
To add to an existing project, navigate to the project’s Home page, then hit the blue + button and choose Import items....
Then Browse for the file you’d like to import.
As noted above, use the Preview Import… button to confirm that the system is parsing your import file correctly, then hit Go to import.

Note that this import option does not check whether an imported item already exists in the project – it will import all items in the file as-is, even if that creates a duplicate. If you need to avoid duplicates, use one of the import options described below.
Update a Project’s Work Items
This import option replaces the work items in a project with the items in the import file. Note that this assumes the import file contains ALL work items. If a work item exists in the project but not in the import file, the work item and any line items will be deleted from the project. Work items that exist in both will be updated in the project with the data in the import file. This option does not modify line items.
This is a useful import option because if you import any existing line items using the item import in Project Home, you’ll just create duplicates.
Essentially, you’re re-importing a fresh set of work items while keeping the line items as well as the project’s settings and configurations. To use this option, go to the Actions pane in the project’s Settings tab. Download a fresh template under “Existing, Complete Work Items,” and use the Full Estimate sheet.
The last step in this import option is to review the change summary.
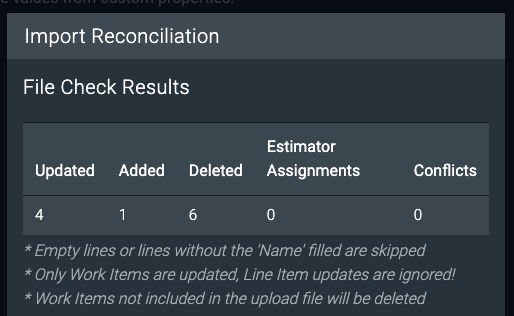
Review the numbers shown to make sure they fit your expectations.
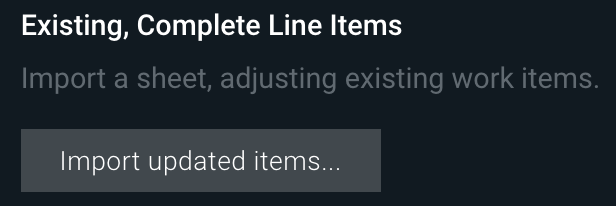
Update Existing Line Items
This option pairs with the previous one, since that one updates only work items, and this one updates only line items.
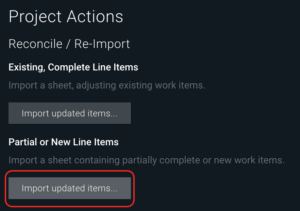
To use this option, go to the Actions pane in the project’s Settings tab, and hit the Import updated items… button under “Partial or New Line Items”.
Here’s how to prepare your import file. Two columns are required so the system can identify the line items to update:
- Work Item Id: The
idvalue for the work item containing the line item to update - Line Item Name: The
Nameof the line item to update
Beyond those two, it works just like the sheets in the import template – put the Short name of a Structure column in the header row, and the estimate values in the rest of the rows. So, for instance, if we wanted to update Matl column values for the same line item in different work items, we could import this:
| Work Item Id | Line Item Name | Matl |
| 100-00-001 | Required Materials | 1500 |
| 100-00-002 | Required Materials | 1500 |
| 100-00-003 | Required Materials | 1500 |
Useful notes:
- If you make a mistake with a work item id, and the system doesn’t recognize it, it’ll warn you and then ignore that row.
- You only need to include columns you’re changing values in; values in absent columns will be left unchanged during import.
- You can only use this to update values you could update yourself in OAE – not distributions, calculated columns, etc.
Add New Line Items to Existing Work Items
This import option works much like the previous one. Same import button, same import file columns.
Instead, just provide the Name of a new line item that doesn’t exist in that work item. Any Structure columns you include will be added to the line item in OAE. In fact, the sample import lines in the previous section would work just as well with this import option if those work items didn’t already have a JML line item.
Learn More
Check out the rest of our User Guides to learn more about OAE.
